
The OPC Client for MQTT collects OPC data in real-time and publish them into MQTT brokers. You can use it to send the collected data to Azure IoT Hub as well. This tutorial provides detailed steps how you achieve this configuration. The main steps are as follows:
1. Create an Azure IoT Hub in the Azure Portal. If you do not yet have access to the Azure portal, you can create a free Azure account here.
2. Extract the Azure IoT Hub connections data.
3. Configure the OPC Client for MQTT to connect to your configured IoT Hub.
Steps to collect and send OPC DA data to Azure IoT Hub
1. Create an Azure IoT Hub
a. Login to the Azure Portal with your account.
b. Create a new resource with the type “IoT Hub”.
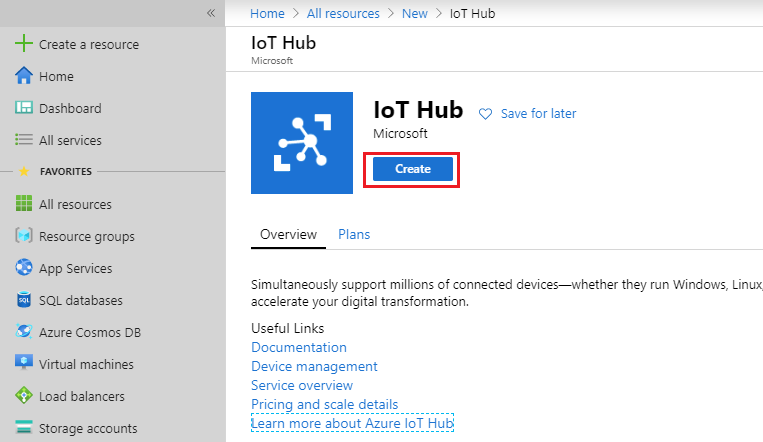
c. Choose a resource group, name the IoT Hub and then finalize your configuration after review:
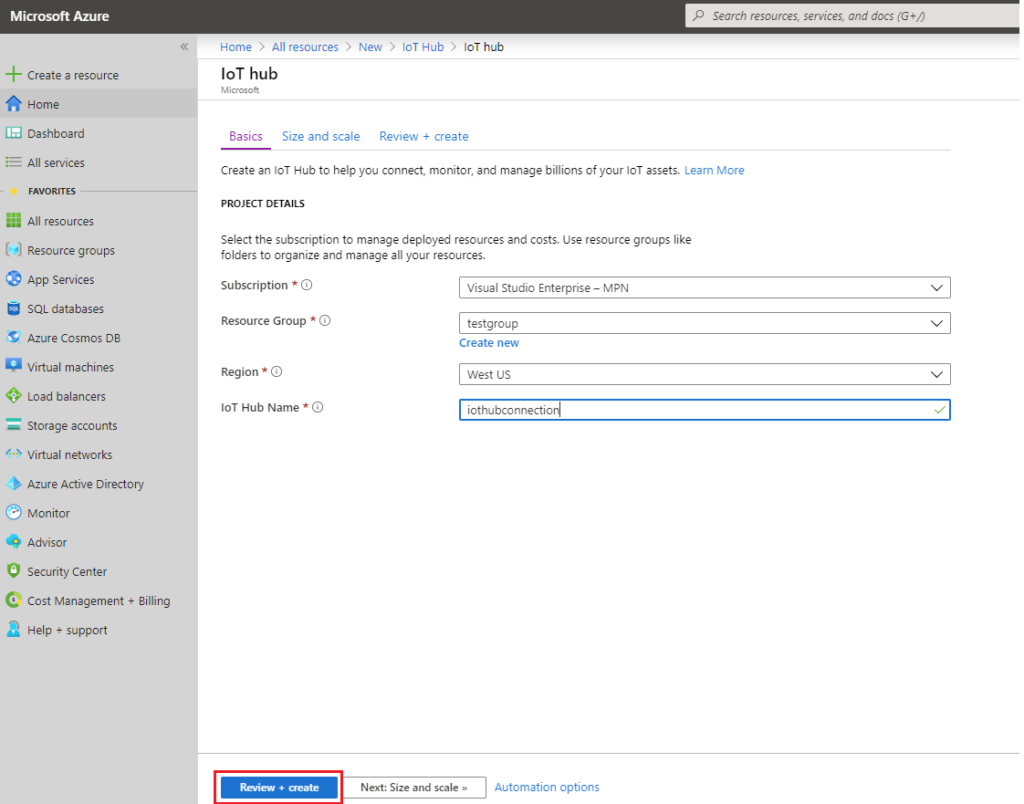
New Azure IoT Hub
2. Extract Azure IoT Hub Connection Data
a. Select the newly created IoT Hub under “All Resources” and select the “Shared Access Policies”(1) and then choose “iothubowner”(2)
b. Copy the “Connection string – Primary key”(3) from the “iothubowner” policy:
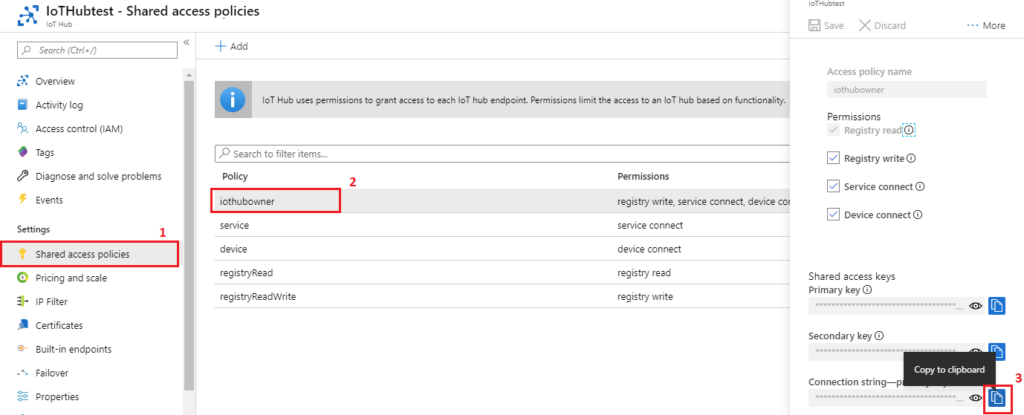
Connection string – Primary Key
Then, we will extract The MQTT connection parameters from this connection string using the “DeviceExplorer” that you can download from here.
c. Open the DeviceExplorer tool and go to the configuration tab. Paste the copied connection string- Primay key connection string (1) , enter the right hostname(2) and then click the “Update” button (3):
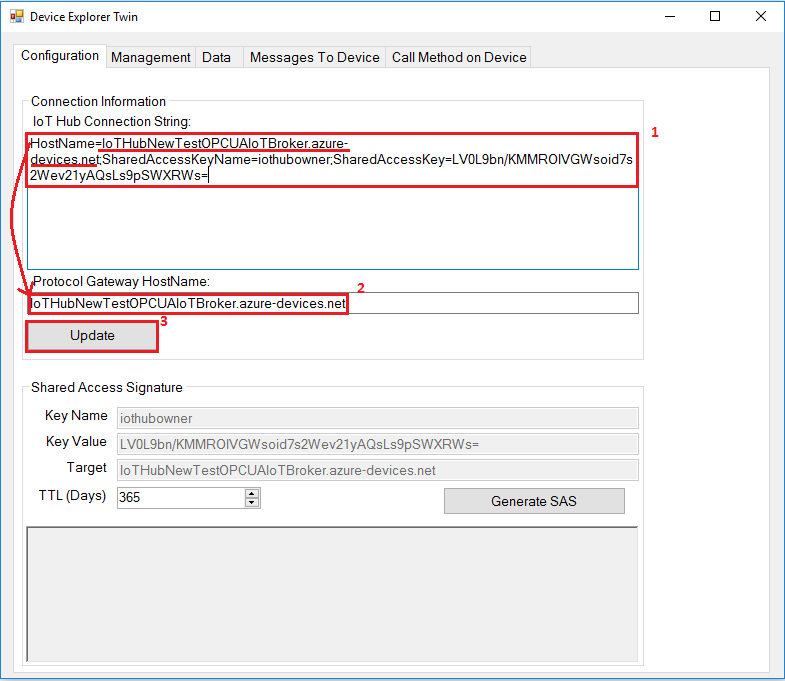
IoT Hub Device Explorer
d. Go to Management Tab (1), select “Create” (2), choose a Device name (3) and then click the “Create” button (4):
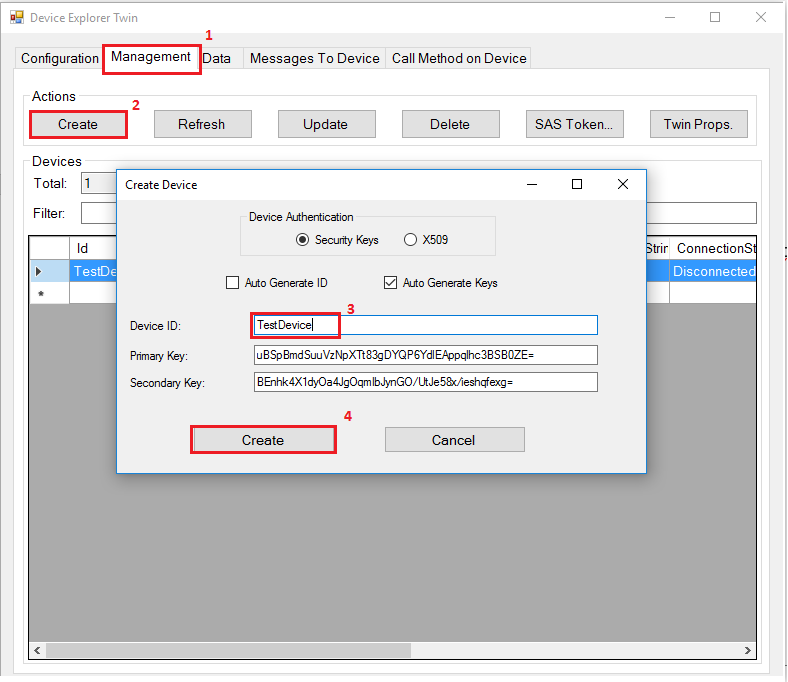
Create IoT Hub Device
e. Click the “SAS Token” button, select the newly created Device (1) and set a life time period (2). Then, click the “Generate” button (3) in order to copy out the required password for the client (4):
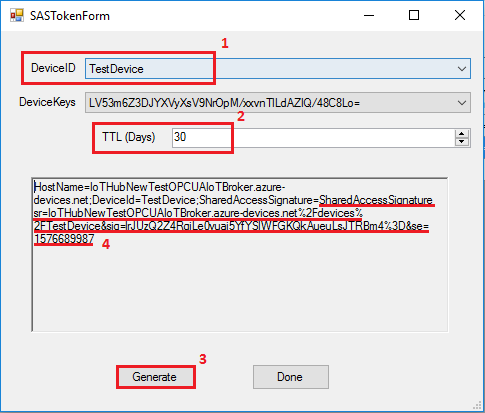
IoT Hub SAS Token
3. Configure the OPC Client for MQTT for connecting the IoT Hub
a. Once you have the OPC Client for MQTT installed and you opened its graphical user interface, you will need to connect to your OPC Server and the OPC DA tags:
- Click the Connect button in the OPC Server menu to connect to local and remote OPC DA servers.
- Right click on the added server node and select Add Group from the displayed menu.
- Right click on the selected OPC Group node and select Add Items from the displayed menu. The Add Items window will be prompted as illustrated in the figure below:
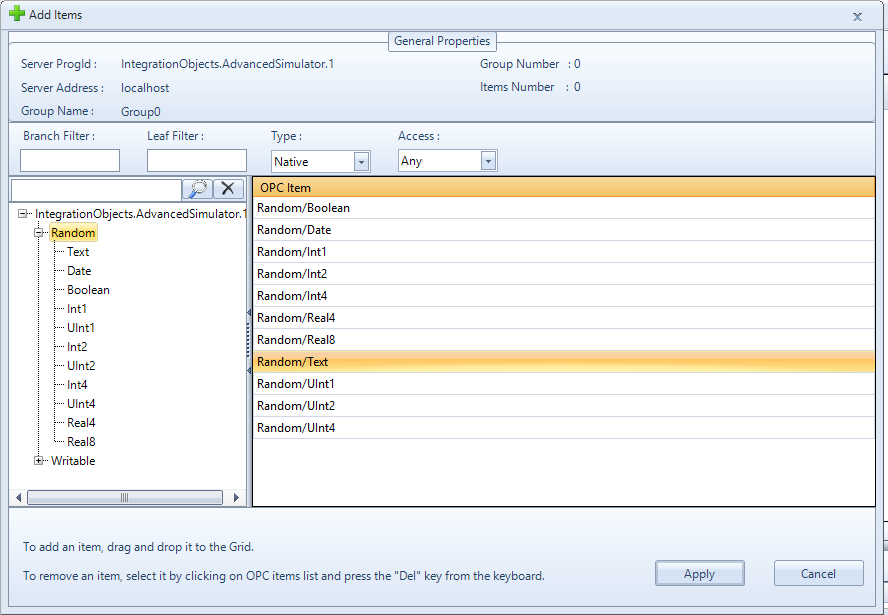
Add Items Dialog
- Drag and drop items from the items tree in the left side to the grid in the right side and click the Apply button.
b. Add New MQTT Agent
- Click the New Agent button located in the MQTT Client menu. The following wizard will be prompted:

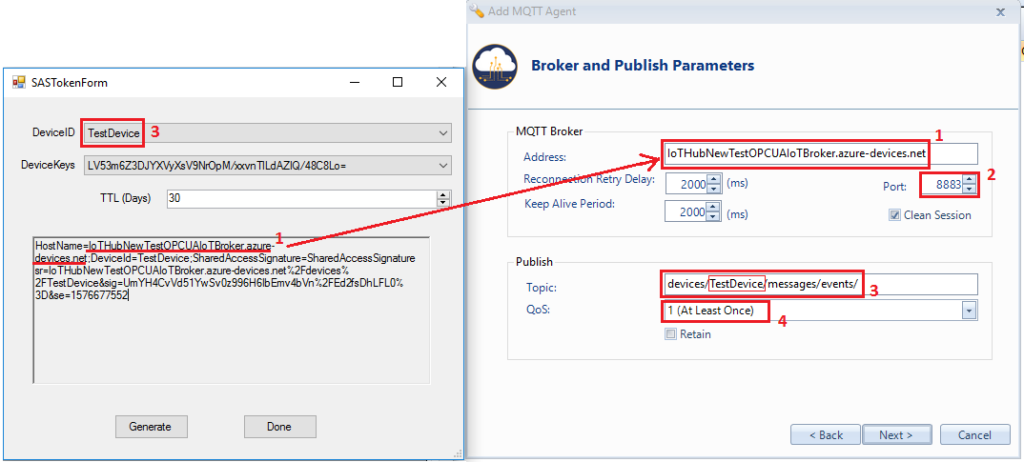
Add MQTT Agent
- The configuration parameters to be entered are detailed below:
– Address (1) : The URL or the IP address of the MQTT Broker which is the IoT Hub Azure hostname connection.
– Port (2) : MQTT Broker port, “8883”.
– Topic(3) : Messages will be published to that Topic. For data sent to the cloud you can use “devices/{device-id}/messages/events/”
– QoS (4) : The Quality of Service that will be used to publish data: “ 1 (At Least Once)”
Broker and Publish Parameters Description
- Right click on the new configured Agent and select Advanced Settings -> Authentication and TLS as illustrated below:
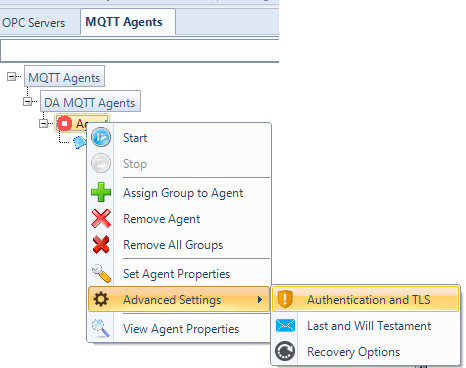
Authentication and TLS
- To configure the agent authentication and TLS, enter the following parameters:
Client ID(1): The name of your DeviceID.
Username(2): Username to connect to the MQTT broker. It should as follows: ”Hostname”/”DeviseID”
Password (3): Password to connect to the MQTT broker. It should as follows:
“SharedAccessSignature sr=IoTHubNewTestOPCUAIoTBroker.azure-devices.net%2Fdevices%2FTestDevice&sig=qYMZUYaG9aGeZIz6vTZRZ5B%2BM%2BxHSgGClJWYL5X%2FQME%3D&se=1574089012”
Use TLS/SSL(4) : Check this option to use a certificate for the communication with the MQTT broker.
Protocol: The protocol that will be used to secure the channel between the MQTT Agent and the MQTT Broker. It should be TLSv1.0,
TLSv1.1 or TLSv1.2 for the connection with Azure IoT Hub .
Certificate Path (5): The certificate file path. Click Browse button to choose the file location.
This certificate should be the one that Azure IoT Hub uses to secure the connection, which is the DigiCert Baltimore Root Certificate. You can download it from here.
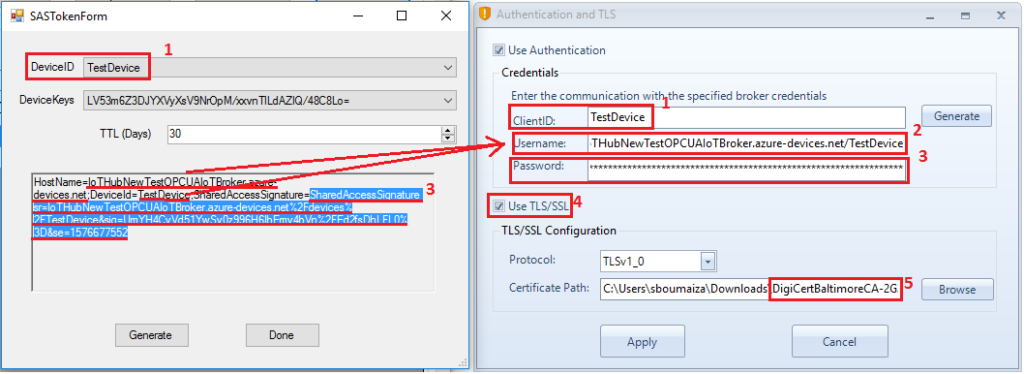
Authentication and TLS Configuration
- Click apply and Start the Agent.
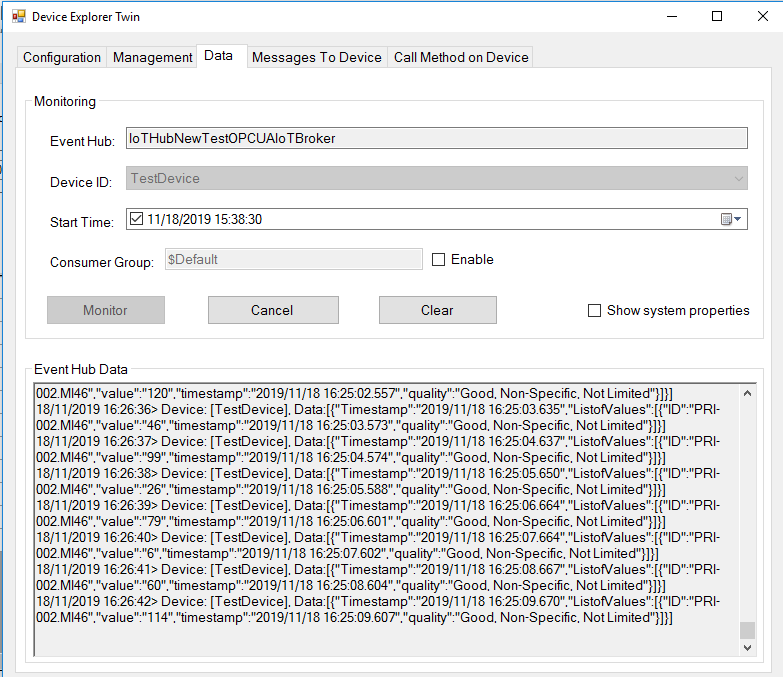
- Verify that your data are transferred to Azure IoT Hub from the “DeviceExplorer”, as illustrated below:
For more information about Integration Objects’ OPC Client for MQTT: https://integrationobjects.com/opc-products/opc-client/opc-client-for-mqtt/

